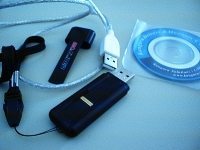
 Prior to receiving this drive I had no experience with such a security device. So. I’m relieved that it really turned out to be fairly easy.
The package comes with the drive, a neck strap, a USB cable and a small CD. The manual and a driver for Windows98 systems is on the CD. I took the time to look at the PDF manual and the instructions for registering your fingerprints is real easy. So simple a politician could figure it out!
After my reboot, I looked in my file manager where I noticed about 6 megs the drive was seen as a CD – obviously as the nonwritable part of the drive. The software in this section of the drive is what is used to register your fingerprints. This cleverly makes the drive portable to almost any system and keeps your fingerprint data secure.
Once you register at least one fingerprint, then the rest of the drive becomes accessible as a normal Removable Drive.
Let me point out that at the moment this device can only be used on various Windows systems. Software has not been written for Linux, MAC or other OS’s. When questioned about this I was told it wasn’t out of the question.
I have a multiboot laptop so when I booted into my Linux RedHat OS with the drive in the USB port, it was simply seen as the “CD drive”, just as I had seen it in Windows. So it only needs linux software to register fingerprints to “open” it up as a Removable drive. My advice is if you are interested in using the drive with other OS’s, just let them know. They are very friendly.
Giving it The Finger
|
On my system clicking on the “CD” drive in the file manager starts up the registration software. On XP the Registration Window may just pop up once the drive is plugged in. What you see is a “cartoon” of two hands.
|
 |
 |
Click on any one of the 10 fingers to register a print. I’m lucky enough to have 10 fingers of my own, so I picked one and went to the next window which will now scan in the print. I slid my finger across the slit on the drive.
|
 |
Several times. It has to get several readings of your print before it’s satisfied. It does take a bit of practice to get the hang of how fast to slide your finger over the slit, but after having this for a few weeks it’s like riding a bike. Easy to do and you hardly think about it. After you register a print you can register a password.
When removed from the USB port, the drive becomes “secret” again and I have to “OpenSeseme” it whenever I plug it in. So, I removed it and plugged in my USB 2.0 card in my laptop (I figured I’d test that too as the drive has a USB 2.0 connection). I inserted the bio-drive. The “10 finger” picture immediately pops up showing the registered finger in blue. |
|
So I scrub my finger across the slit. I did that about a couple of times until the scanner read the print. Yippee, it let me in! Ok, so now I have opened the writable part of the drive. I copied some mp3’s onto the drive and am listening even as I write this. It’s nice to know that my songs are safe from prying ears.
|
 |
|
At this point I want to add another fingerprint to the database. On the toolbar
|

